Products
 Car Audio Back Back
- Antennas & CommunicationBack
- Fascias To SuitBack
- Alfa Romeo
- Audi
- BMW
- Cadillac
- Chevrolet
- Chrysler
- Citroen
- Daewoo
- Dodge
- Eunos
- Fiat
- Ford
- GM
- Great Wall
- Holden
- Honda
- Hummer
- Hyundai
- Isuzu
- Jeep
- Kia
- Land Rover
- Lexus
- Mazda
- Mercedes Benz
- Mini
- Mitsubishi
- Nissan
- Opel
- Peugeot
- Pontiac
- Proton
- Renault
- Rover
- Skoda
- Smart
- Ssangyong
- Subaru
- Suzuki
- Toyota
- Universal
- Volkswagen
- Volvo
- Chrysler&Dodge&Jeep
- Chevrolet&Hummer
- Harness & IntegrationBack
- Leads & Adaptors
- Terminals
- Sound
- Car Audio Fittings
- Fuses
- Speaker Spacers
- Power Kits & Cabling
 Mobile Accessories Back Back
- Cables
- Phone Holders
- Chargers
- Power Banks
- Earphones
- Adaptors
- Accessories
- Apple Accessories
- Android Accessories
 Workshop Back Back
- Adhesives. Aerosols & Glues
- Anderson Plug
- Batteries
- Battery Isolators
- Battery Lugs
- Cables
- Cable Accessories
- Cable Ties
- Carpet
- Crimp TerminalsBack
- Diodes & Pin Switches
- FusesBack
- Gloves
- Heat Shrink
- Installation Aids
- Loom Tube
- Relays & Relay Sockets
- Rivnuts & Grommets
- Screws
- Sound Deadener
- Spiral Wrap
- Switches
- Tape
- Tools
- Grille Cloth & Dacron
- Voltage Converters
 CCTV Security Back Back
 Lighting Back Back
 Marine Back Back
 Power & Accessories Back Back
- Batteries
- Lighting & Power
- Cables
- USB Sockets To Suit
- Distribution Blocks
- Fuses
- Circuit Breakers
- Power Sockets
- Voltage Converters
- DC Plugs
 Safety Back Back
- Dash Cam
- Parking Sensors
- Rearview Cameras
- Rearview Mirror Monitor
- Screens
- Leads & Adaptors
- Reversing Beeper
 TV Mount Back Back
 Apparel Back Back
- Back

- Back
- Home Back
- About Us Back
- Sizes Back Back
- Buy More Save More Colours Back
Back- #002 Orange Marble
- #003 Pink Gold
- #005 Sugipinku
- #006 Sugi Orange
- #007 Dark Water
- #008 Sensual
- #009 Aji Gold
- #010 Brown Gold
- #011 Brown
- #012 Sugipinku
- #013 Cedar Orange Red
- #014 Deep Impact
- #015 Aji Red
- #016 Satsuma Pink
- #017 Satsuma Green
- #018 Natural Flow
- #019 Crazy Pink Shrimp
- #020 Crazy Orange
- #021 Satsuma Orange
- #022 Satsuma Black Smoke
- #023 Sakurajima Pink
- #028 Benikawamuki
- #030 Black Magma
- #031 Glove-kun
- #032 Accomplice Red-kun
- #040 Gross Aji Red
- #051 Wild Berry
- #052 Red
- #062 Orange Trick Shrimp
- #064 Gran Purple Neon
- #074 Black Cherry
- #091 Pearl White
- #092 Harlequin Black
- #093 Aji
- #094 Black Opal
- #097 Red Devil With Rattle
- #099 Akakage / Red Head
- #CSUV01 Crazy UV Pink Flam
- #CSUV03 Crazy UV Orange Furler
- #IM06RT Metal Blue With Rattle
- #IM07RT Metal Green With Rattle
- #IM08RT Metal Red With Rattle
- #SD4 Satsuma Tradition Olive Akakage
- #S5 Satsuma Tradition Olive Black Fog
- #SD2 Satsuma Inheritance Green Kuro-kage
- #SD5 Satsuma Tradition Olive Black Fog
- #SH03 Pink / Gold
- #SH04 Orange / Gold
- #SH06 Ikanago Orange
- #SH08 Sandeel Lime Chart
- #CS01 Krazy Mitias
- #CS02 Krazy Leaf
- #CS04 Krazy Brown Cliff
- Colours Back sale
Back- #001 Pink Marble
- #002 Orange Marble
- #003 Pink Gold
- #004 Orange
- #005 Sugipinku
- #004 Orange Gold
- #006 Sugi Orange
- #007 Dark Water
- #008 Sensual
- #009 Aji Gold
- #010 Brown Gold
- #011 Brown
- #012 Sugipinku
- #013 Cedar Orange Red
- #014 Deep Impact
- #015 Aji Red
- #016 Satsuma Pink
- #017 Satsuma Green
- #018 Natural Flow
- #019 Crazy Pink Shrimp
- #020 Crazy Orange
- #021 Satsuma Orange
- #022 Satsuma Black Smoke
- #023 Sakurajima Pink
- #028 Benikawamuki
- #030 Black Magma
- #031 Glove-kun
- #032 Accomplice Red-kun
- #062 Orange Trick Shrimp
- #064 Gran Purple Neon
- #093 Aji
- #094 Black Opal
- #S4 Satsuma Tradition Olive Akakage
- #S5 Satsuma Tradition Olive Black Fog
- Accessories Back
- Buy More Save More Colours Back
- Appliances Back
 Mobile Phones Back
  Tablet PC & Accessories Back Back
 Consumer Electronics Back Back
SERVICES
Collections
Sub page
 Computers & Networking Back Back
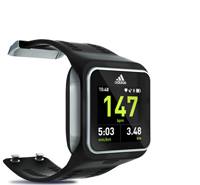
Choose your training, get real-life coaching, read tips & tricks from pros and keep track of your performance.
More about micoach
micoach is all you need to get the results you want.Whether you want to track your stats, play your music or measure your heart rate, our miCoach devices can monitor your every step - whatever your sport.
View all products
 Electrical & Tools Back Back
 Bags & Shoes Back
  Health & Beauty Back
 Outdoors & Sports Back
 LED Light & Flashlights Back
 Carssss Back


- Antennas & Communication